Expenses are entered into ZotaBooks in expense claims. Expense claims allow individual expenses to be grouped together, the groupings can be based on:
- by date, e.g. daily, weekly, monthly or other frequency, or
- by expense incurrence type, e.g. internal and out of pocket expenses claims, or
- another basis.
Examples of expense claim frequency are:
- users who claim expenses from the company may choose to enter their claims on a weekly basis, ensuring they get the money they are owed for undertaking company business in a timely manner.
- business expenses may be entered in a daily batch which are linked to the transactions in the bank account, making sure that each and every day the bank account expenses are dealt with and entered into ZotaBooks.
Expense Claim Lifecycle
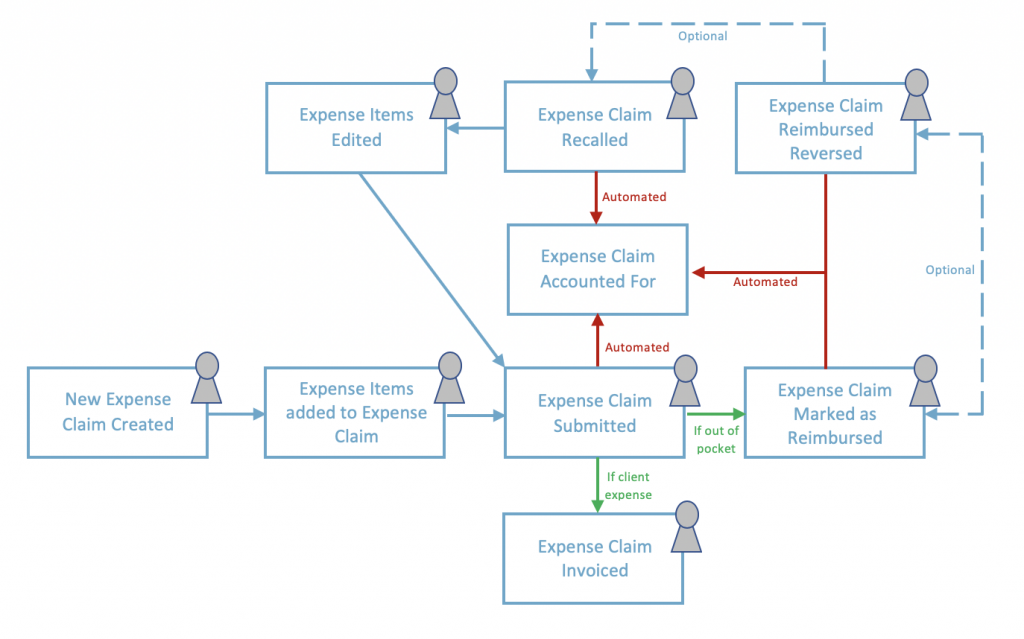
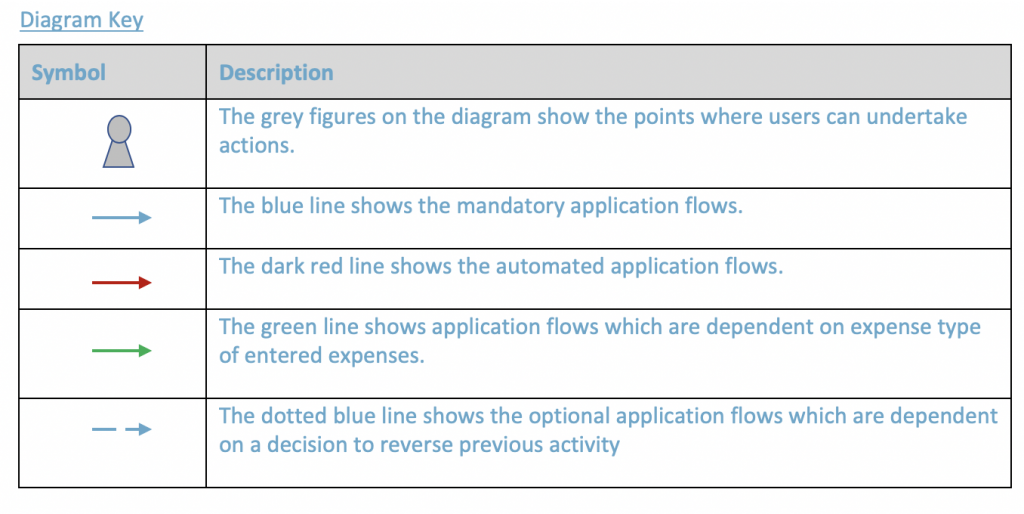
Expense claims follow a predefined lifecycle, which makes sure all expenses are accounted for in ZotaBooks. The expense claim lifecycle is outlined below and describes how the users interact with the expenses application, the flows and automated activities undertaken by the expenses application.
The accounting is automatically undertaken when users submit or recall the expense claim, or when out of pocket expenses are marked as reimbursed to claimants or marked as not reimbursed to claimants.
Expense Claim Screen
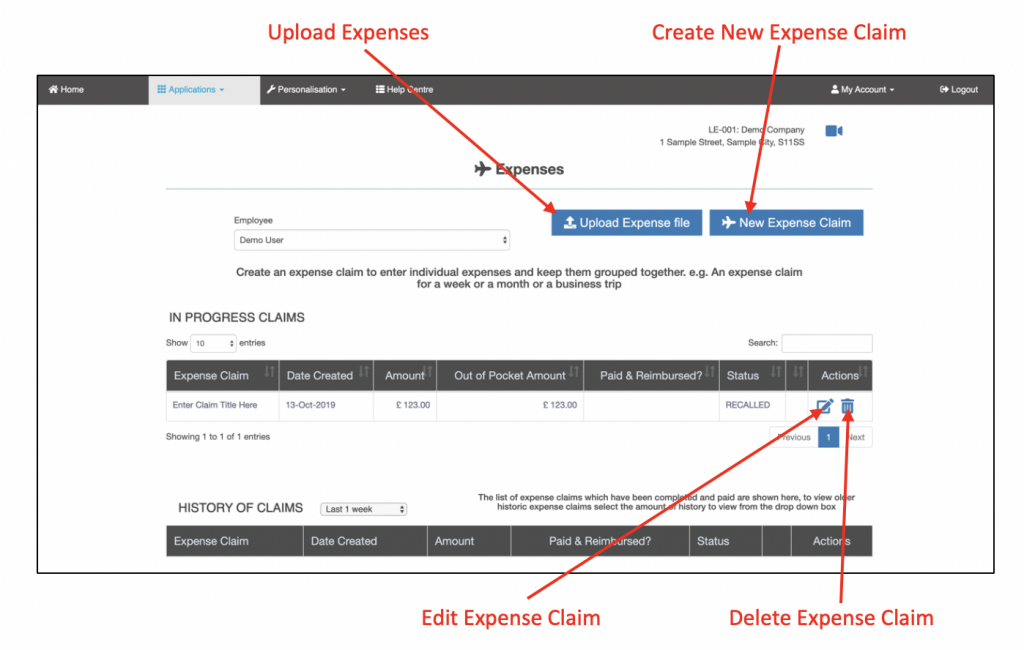
The expense claim screen shows the list of claims which are in progress, those which are completed (moved into History of Claims), permits creation of new expense claims and upload of expenses from a file. Existing expense claims which are in progress can be edited or deleted.
Create New Expense Claim
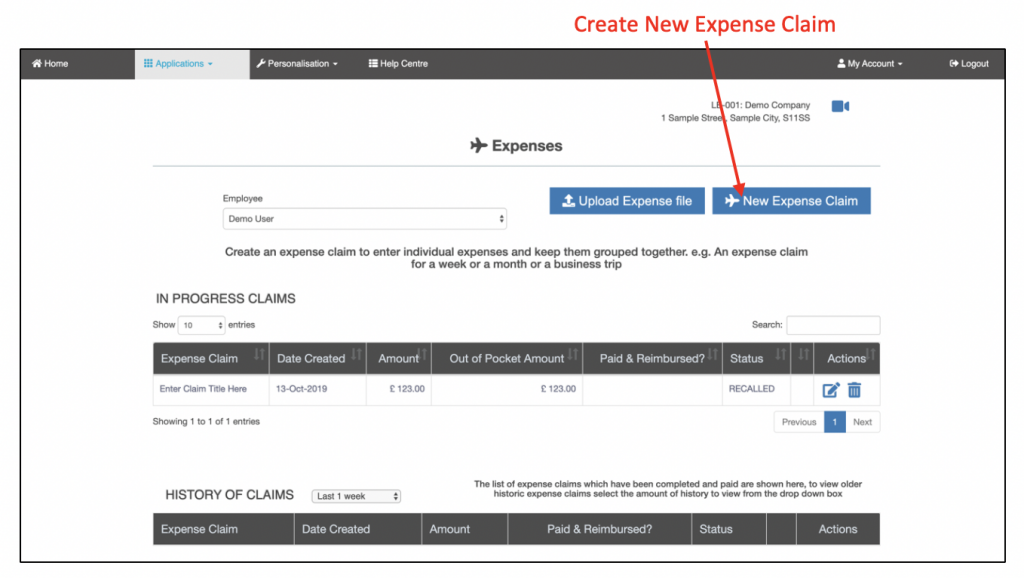
Step One – Create New Expense Claim
Press the “New Expense Claim” button on the expense claim screen.
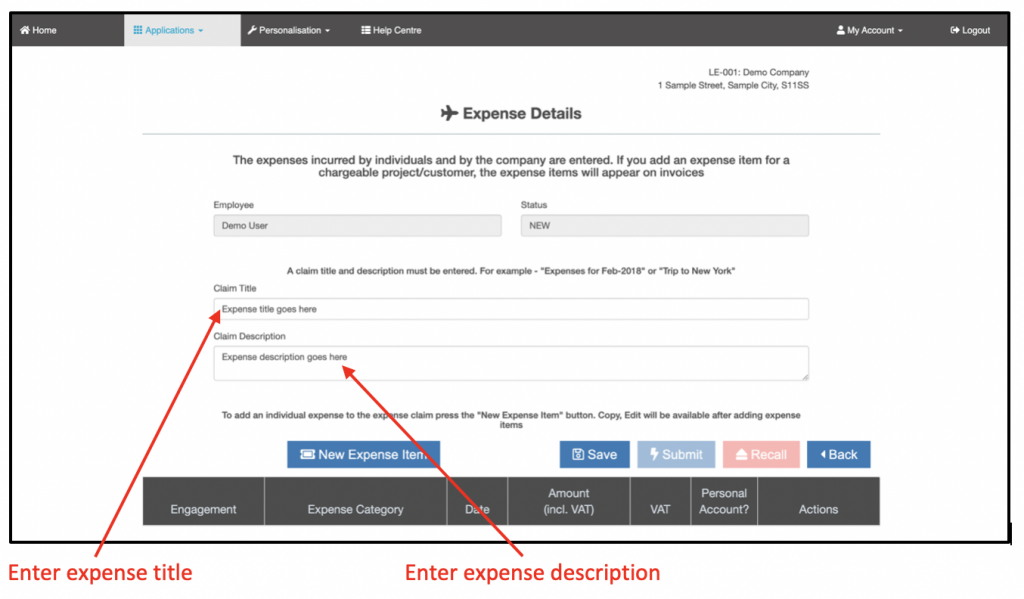
Step Two – Complete Expense Claim Title and Description
The expense claim requires both a title and description be entered.
Step Three – Save the Expense Claim or Add a New Expense Item
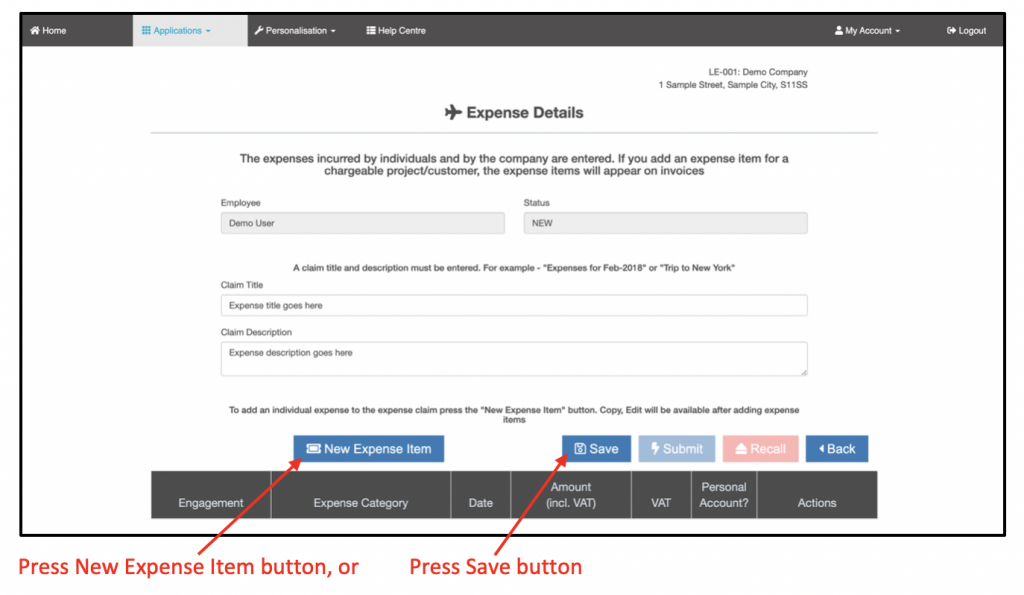
Add Expense Item to Expense Claim
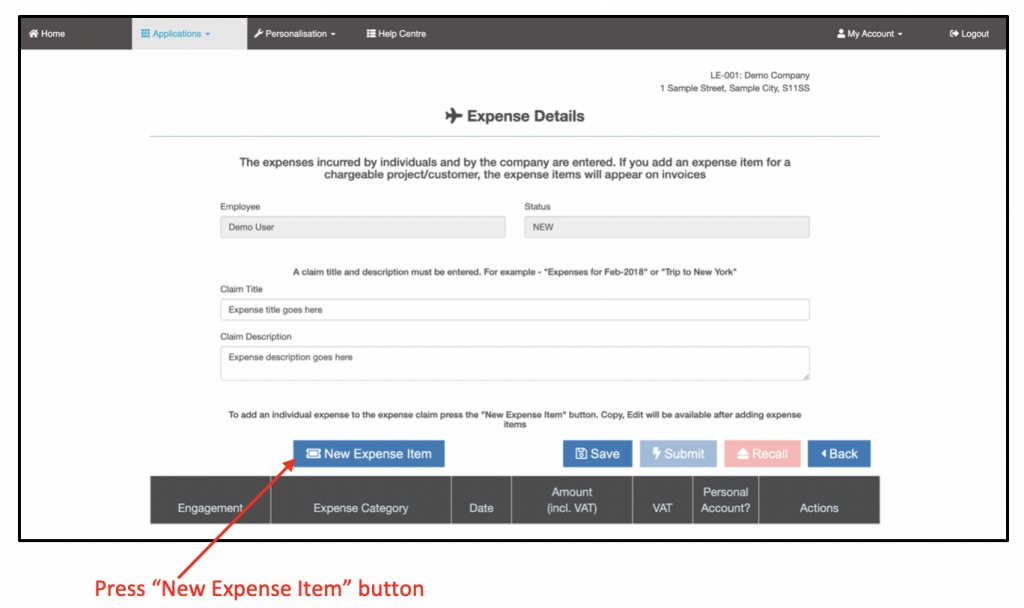
Create New Expense Item
A new expense item is added by pressing the “New Expense Item” button on the expense claim screen.
The expense item entry screen is displayed:
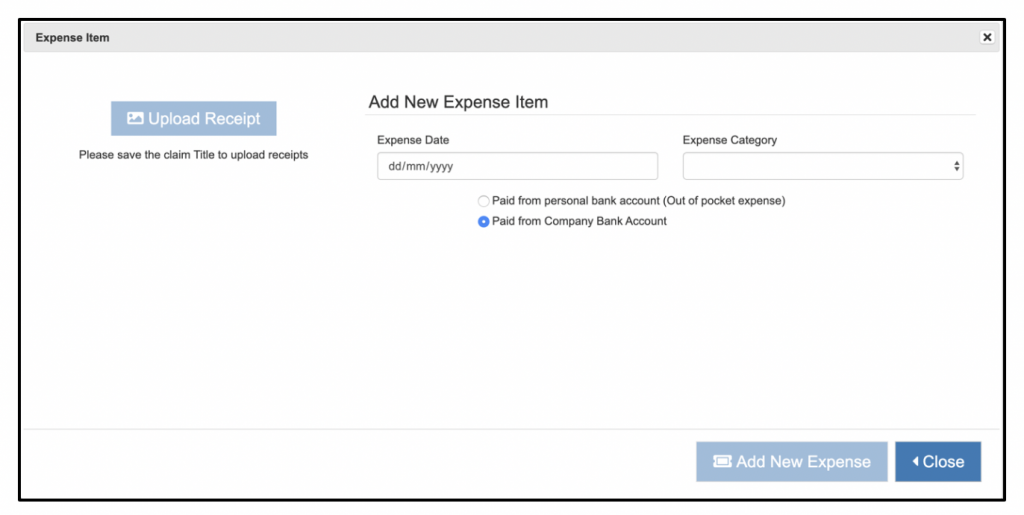
Selecting Expense Date and Expense Category
Select a date from the “Expense Date” date picker and the “Expense Category” from the drop down list:
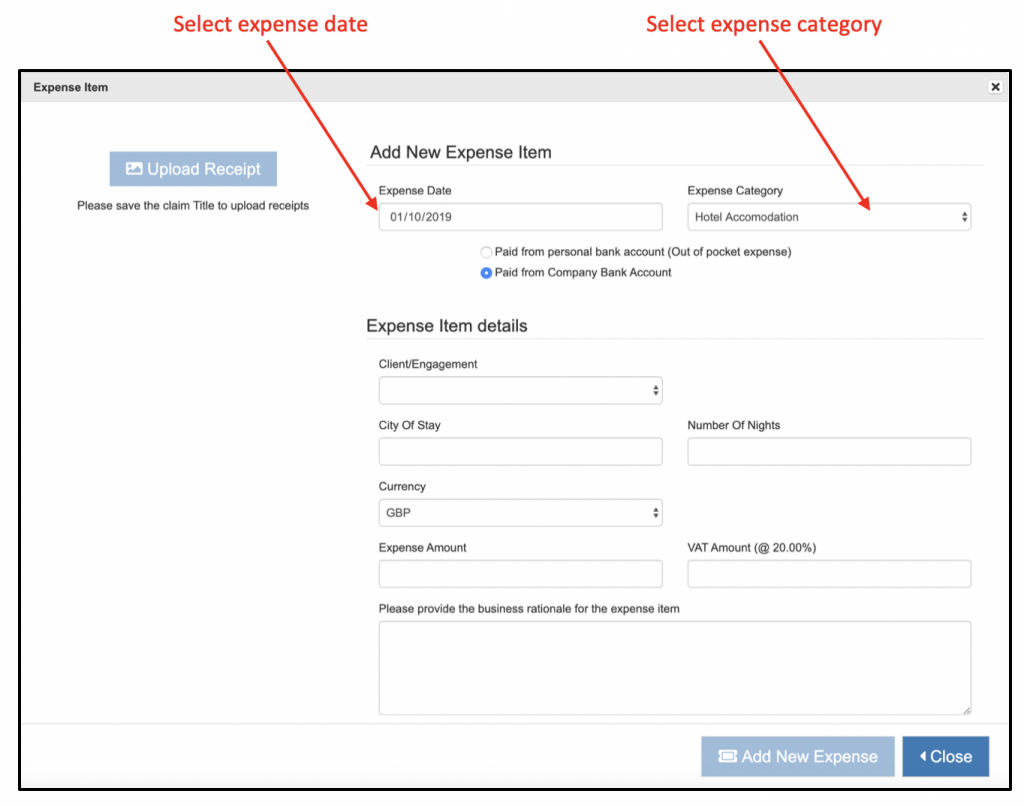
Depending on the expense category selected the expense entry fields which are displayed will vary, for example: hotel accommodation will show a “City of Stay” entry whereas “Food – Evening Meal” will not.
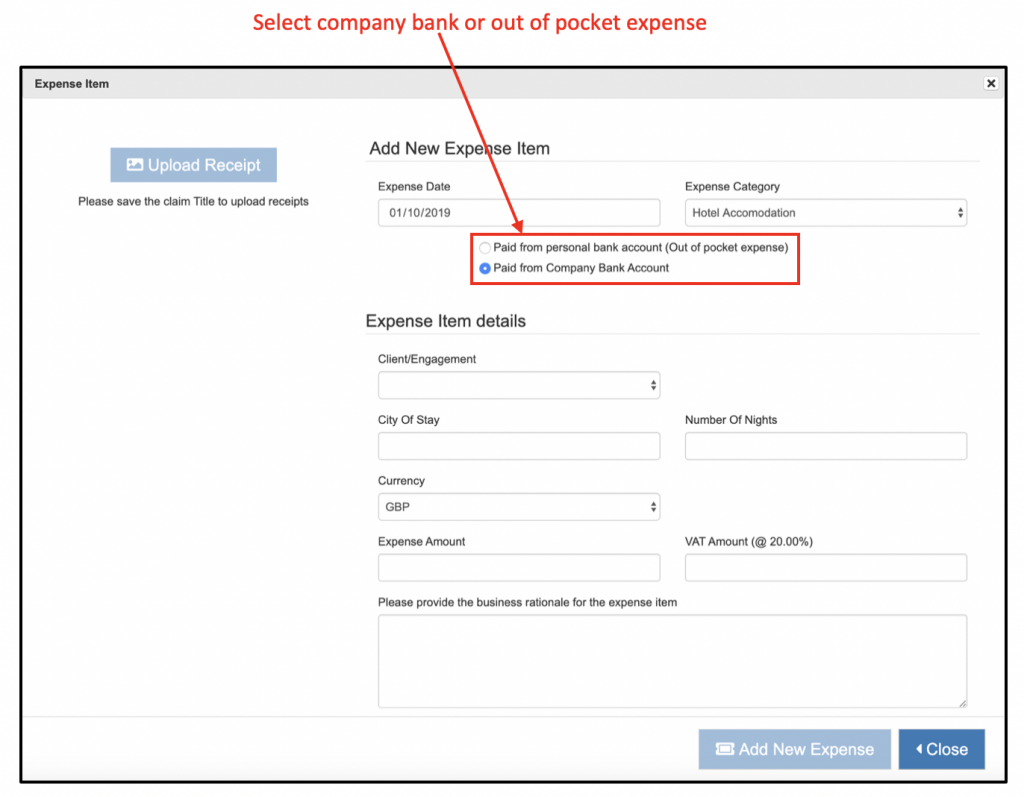
Company Bank or Out of Pocket Expense
All expense categories have the option of whether to select the expense as being paid directly from the bank account or from a personal bank account / out of pocket. An out of pocket expense is reimbursable to the claimant, whereas a company bank account expense is not reimbursable to the claimant.
Completing the Expense Item
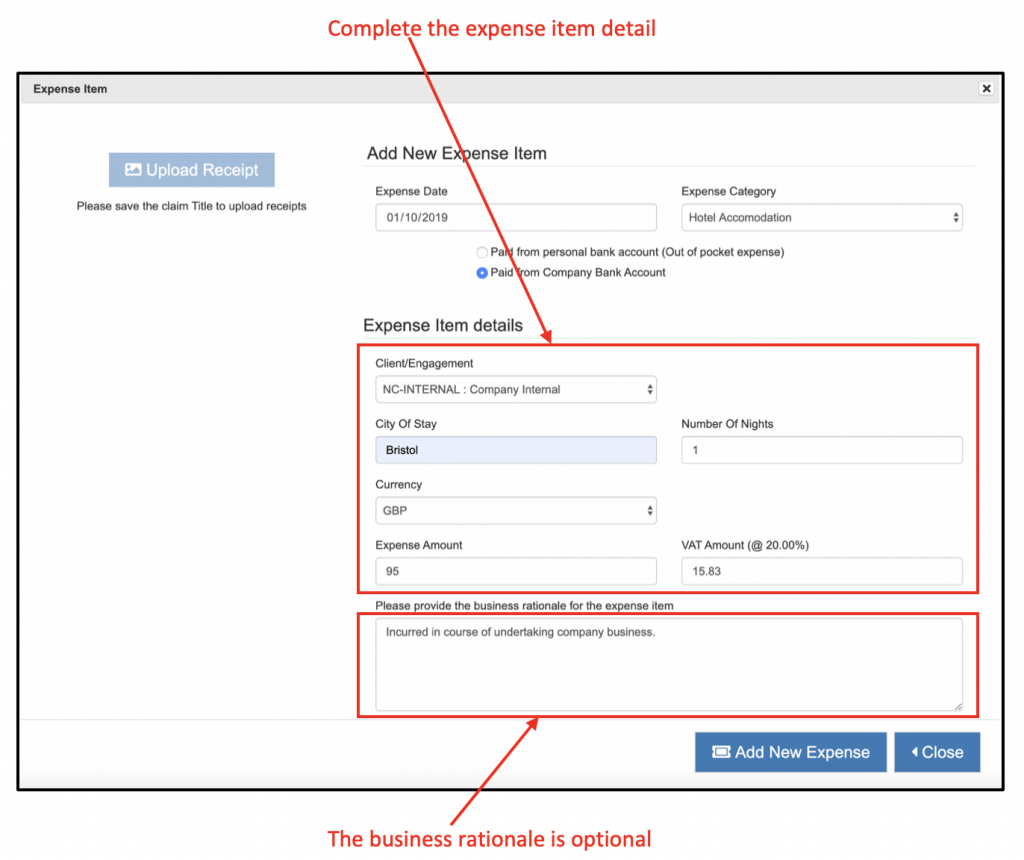
Complete all the fields displayed in the expense item:
Uploading Expense Receipts
To upload an expense receipt the press the “Upload receipt” button.
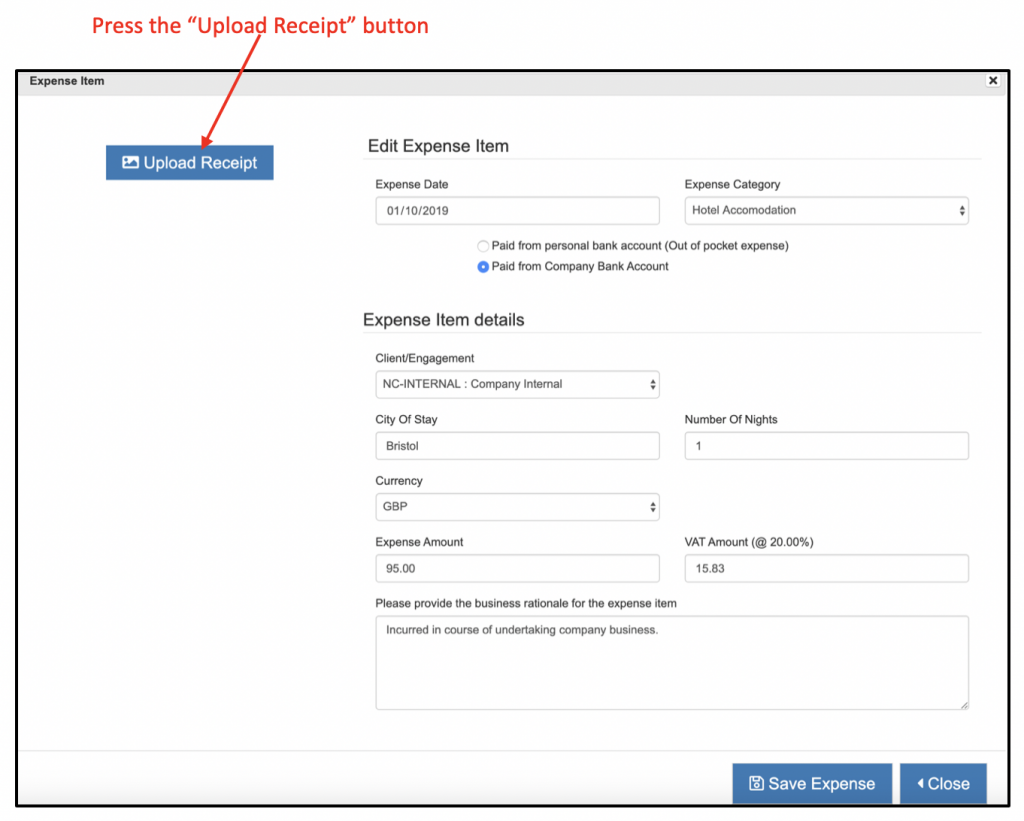
A file finder dialog box is displayed, as per below:
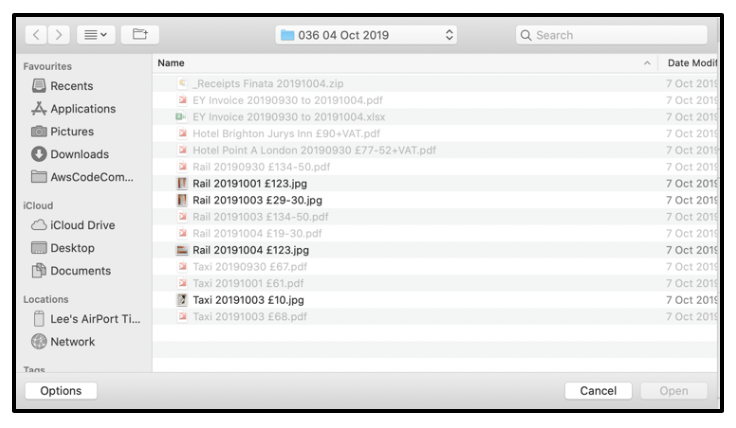
Select the file required, the press the “Open” button. The expense receipt is displayed alongside the expense item details.
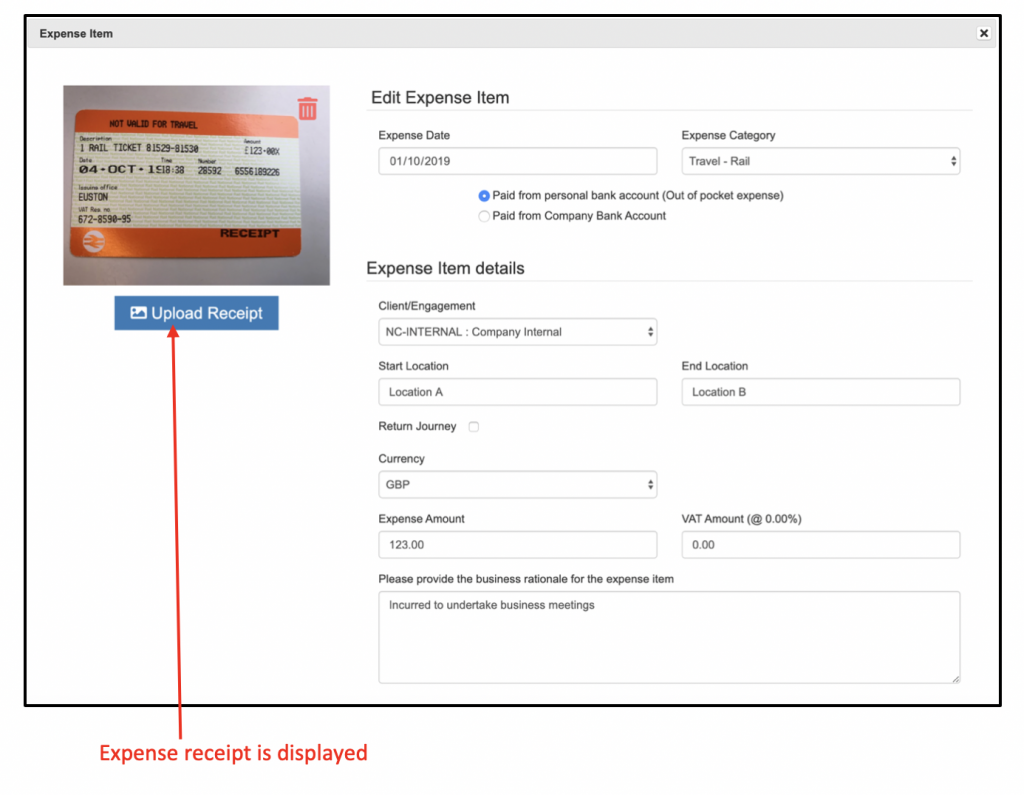
Multiple expense receipts can be added to each expense item, for example: multiple pages of a hotel invoice.
Saving the Expense Item
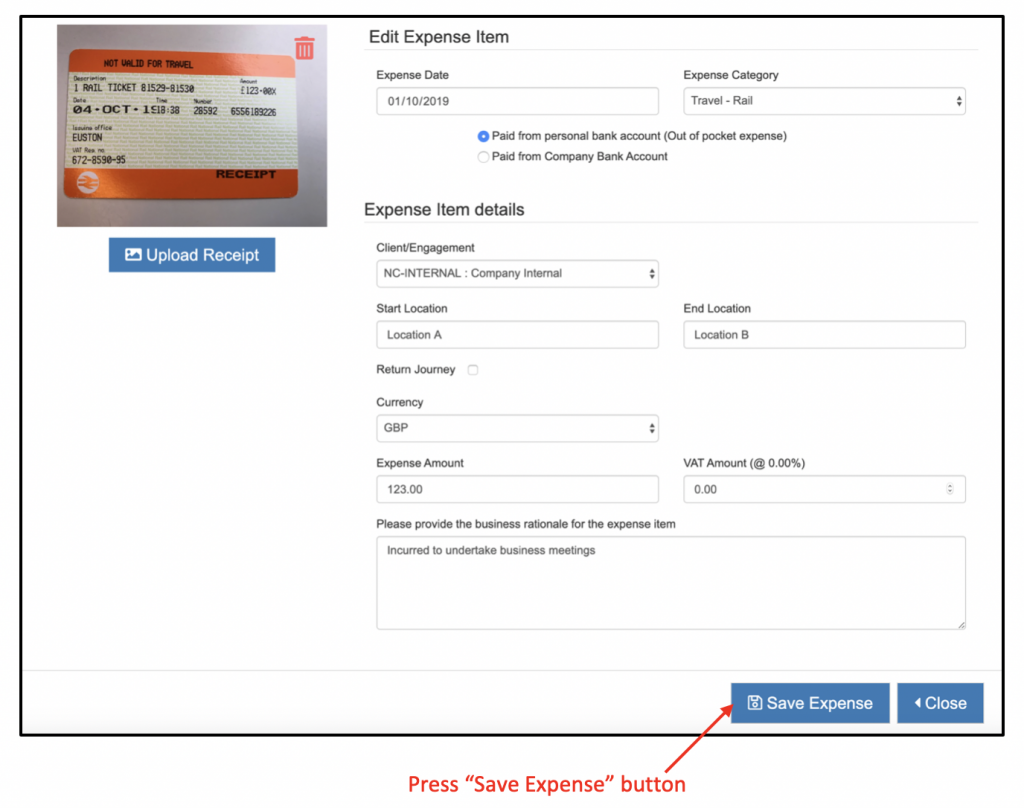
Press the “Save Expense” button on the expense item window.
Deleting Expense Receipts
An expense receipt added to an expense item can be deleted. In the example below two identical expense receipts have been added, to delete one press the red trashcan icon.
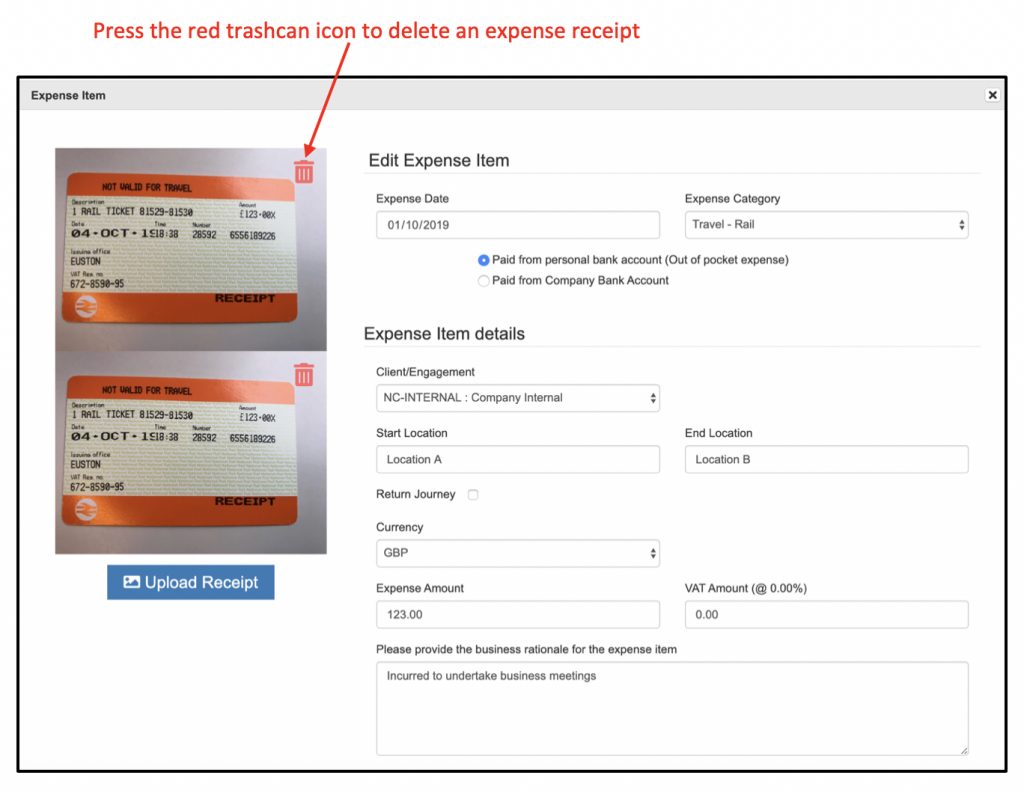
Each receipt has its own red trashcan icon, pressing the icon over the receipt deletes the receipt.
Uploading Expense Items
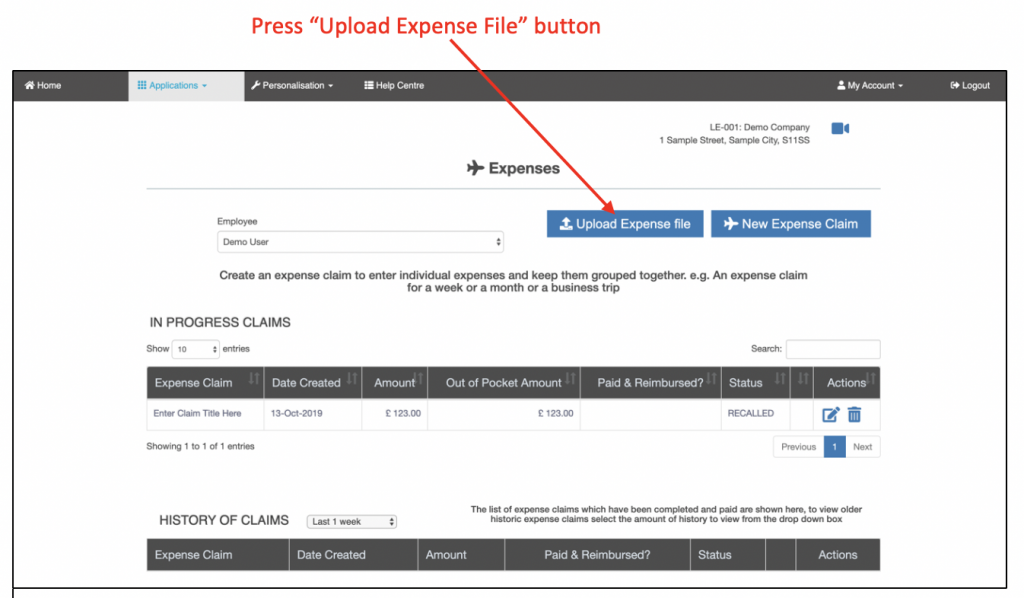
Choose Upload Expenses
The “Upload Expense File” button allows one or more expense items to be uploaded from an external file. The file must be in the correct format.
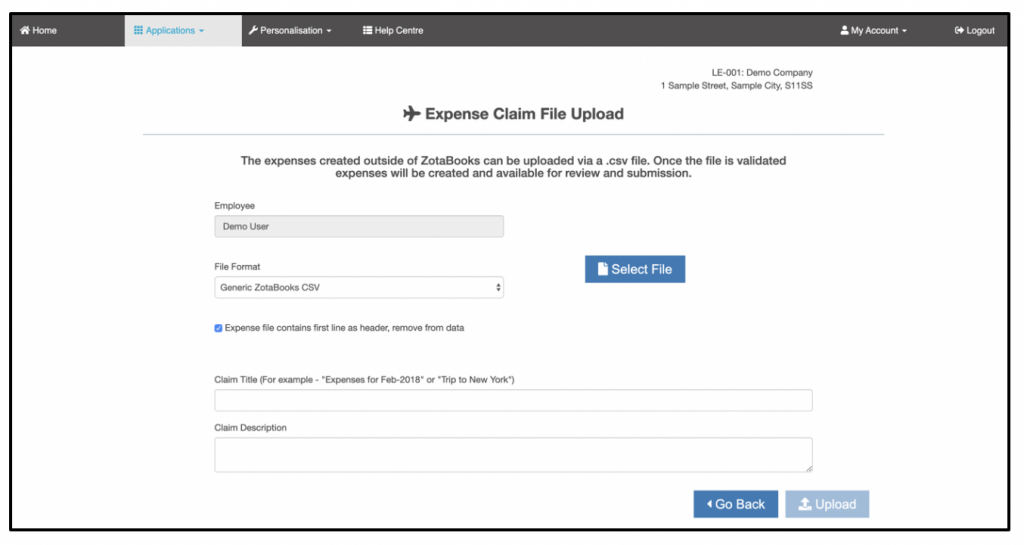
The upload screen is displayed:
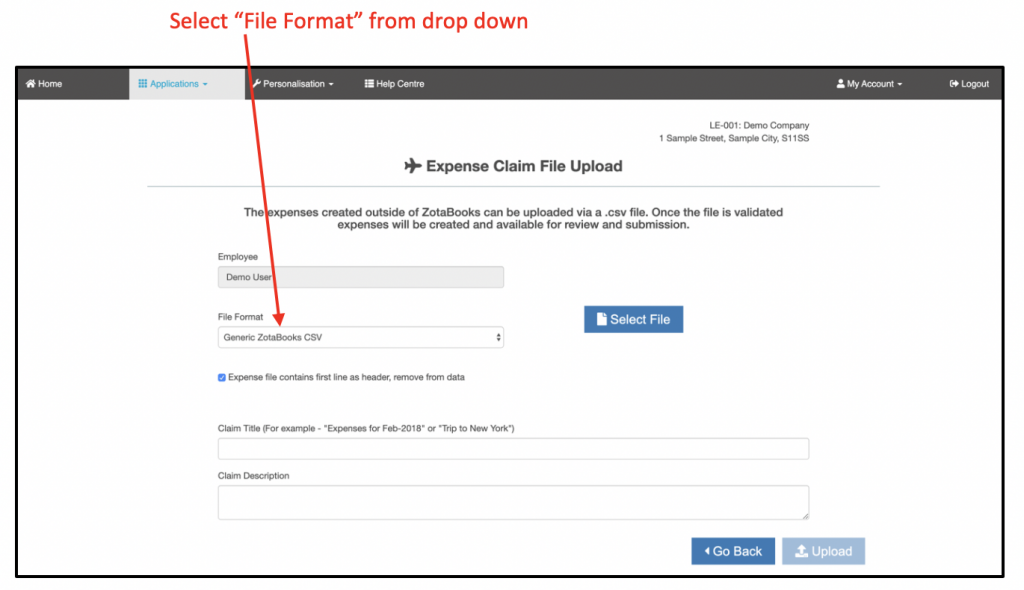
Select a File Format
ZotaBooks can accept file uploads from multiple sources, select the appropriate source of the file to be uploaded.
Selecting an Expense File
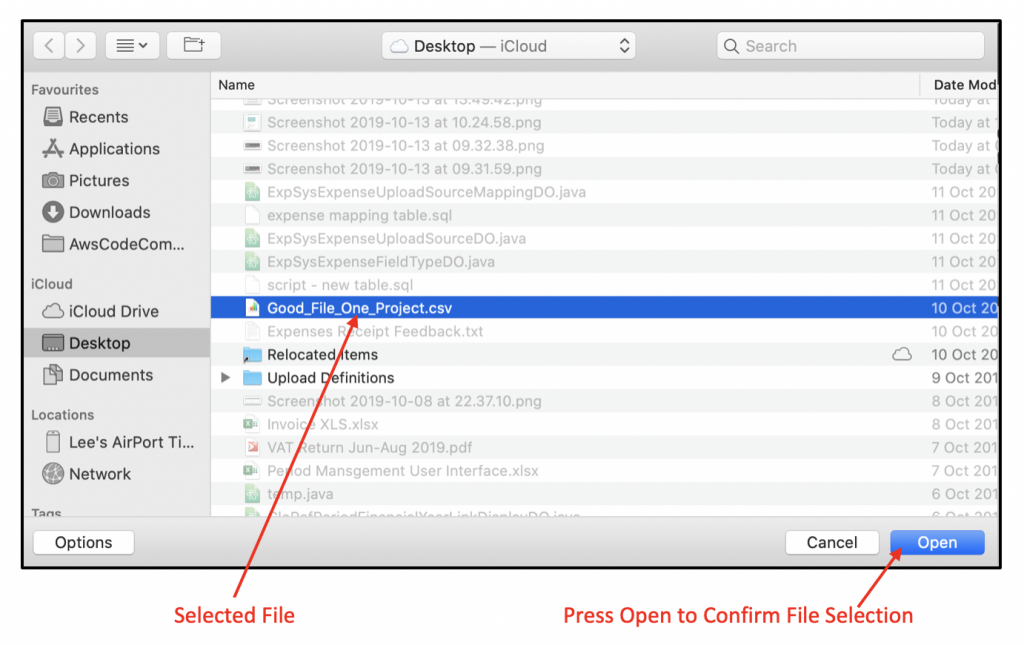
The expense file to be uploaded is selected using the “Select File” button.
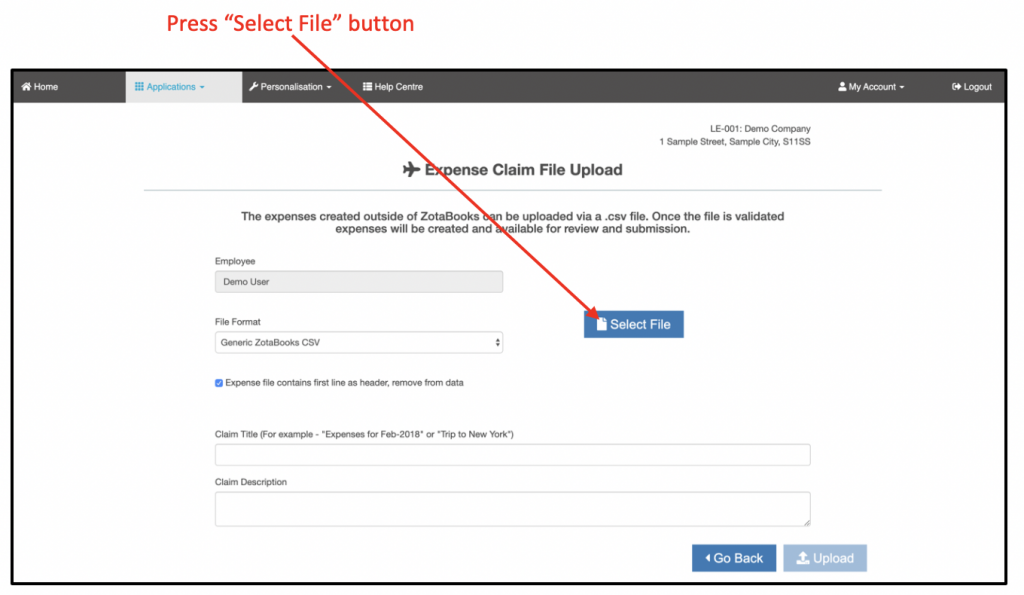
On pressing the “Select File” button a dialog box is displayed which allows the user to select the expense file for upload.
File Format Mapping
When a file format other than “ZotaBooks CSV Format” is selected the option to undertake mappings for expense category, project and currency is provided to the end users. Where these values are identical between source and ZotaBooks the mappings need no action, only where values are different do mappings have to be undertaken.
Validating the Expense File
Once the file is selected, the file is automatically validated, any errors are displayed on the screen.
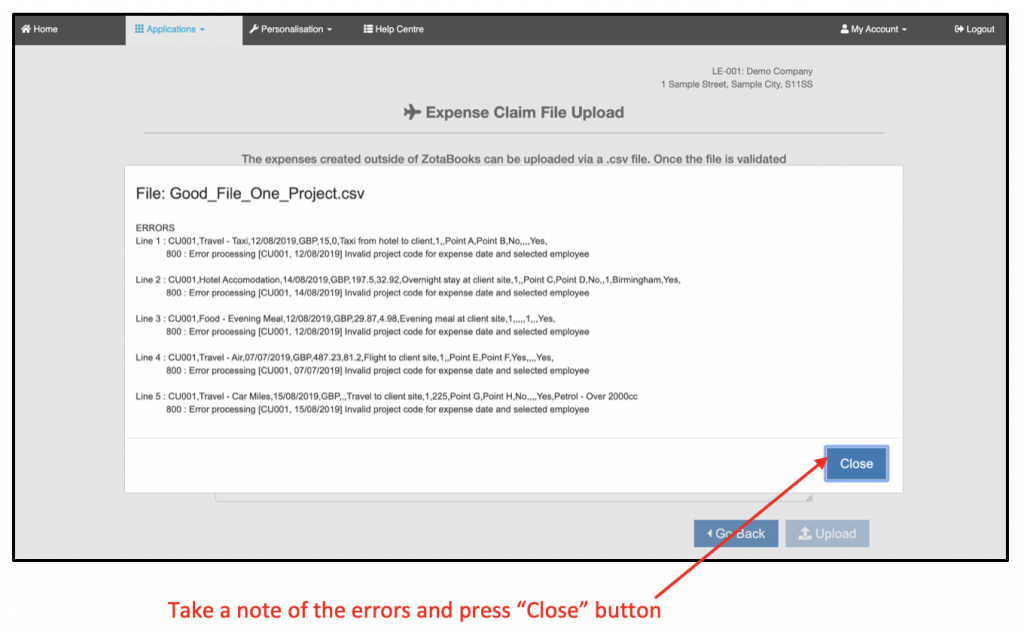
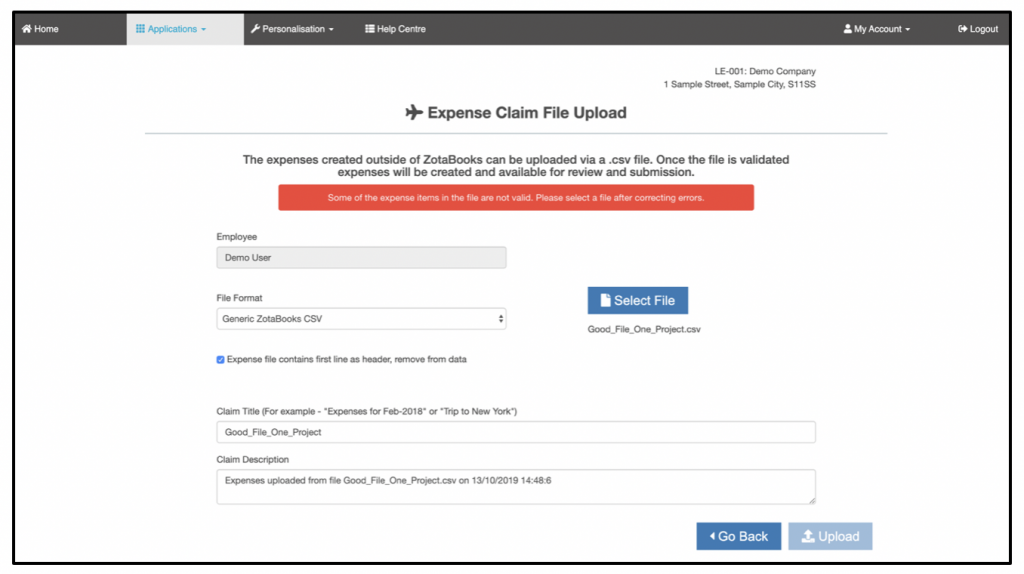
The upload screen is displayed with a red error message, and the “Upload” button is disabled.
Correct the file and retry the upload, once all errors have been corrected a green message is displayed confirming the file is valid. The “Upload” button is enabled:
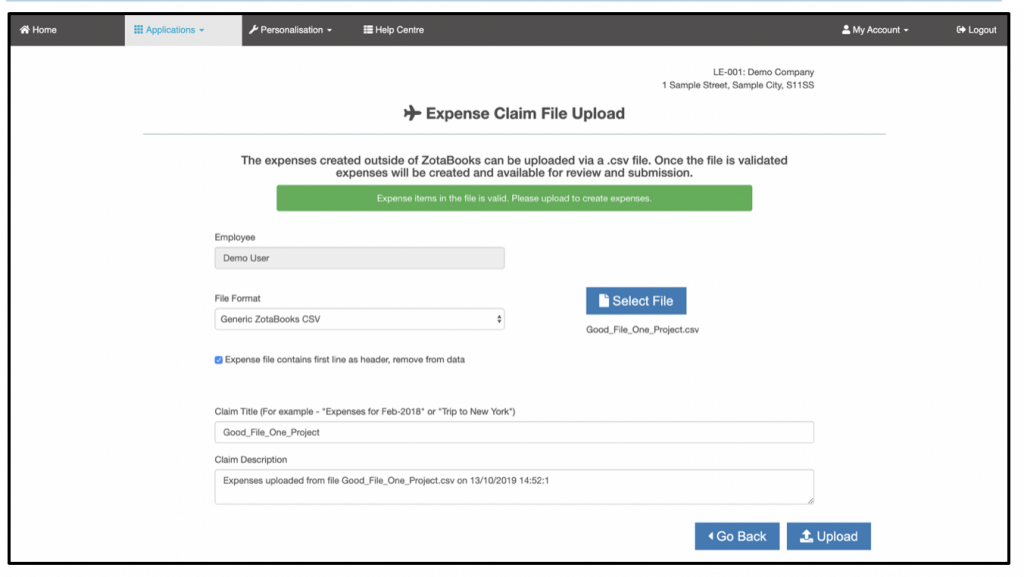
An expense title and description are automatically created, these can be edited prior to uploading the expense items.
Uploading the Expense File
Once the file has been validated, the “Upload” button is enabled. Press the “Upload” button and the expenses file is uploaded into ZotaBooks, a new expense claim is created for the uploaded expense items.
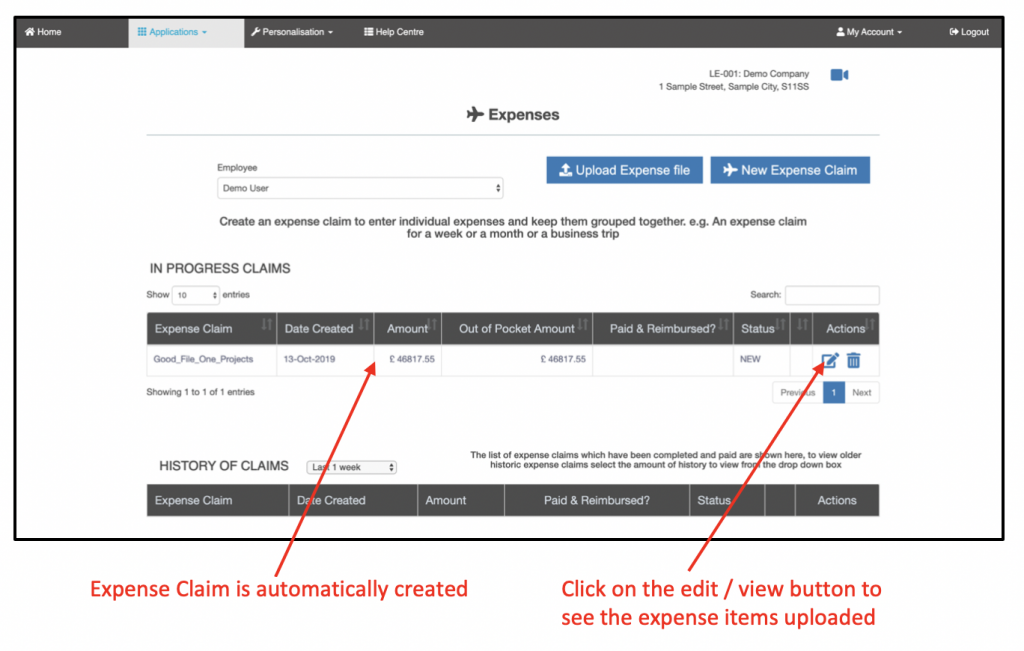
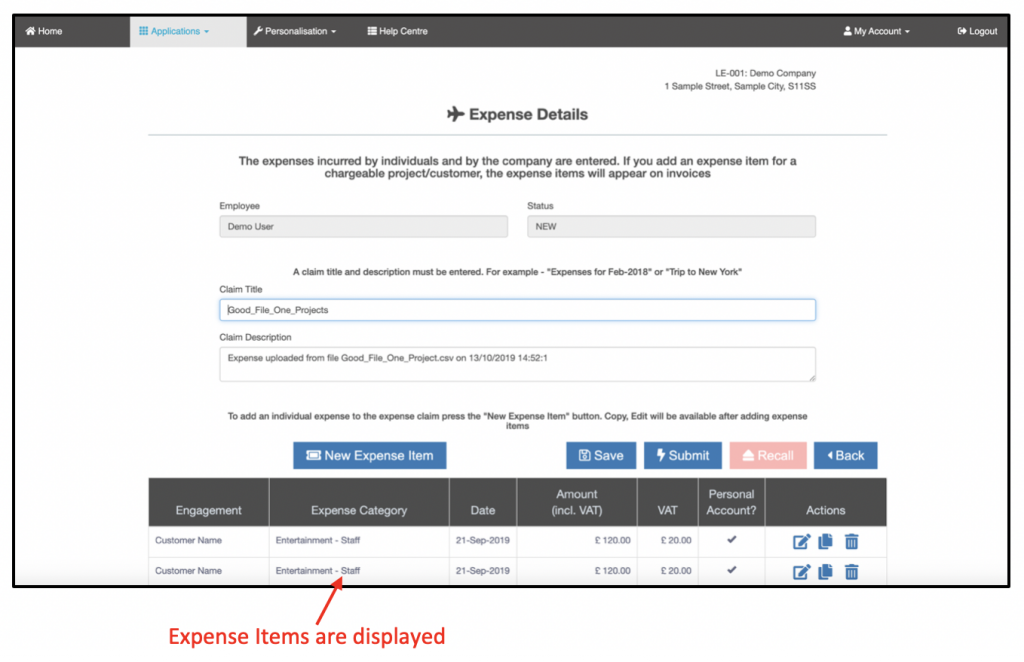
To view the expense items in the expense claim press the “Edit / View” claim icon. The uploaded expense items are displayed.
Expense Item Management
Editing / Viewing an Expense Item
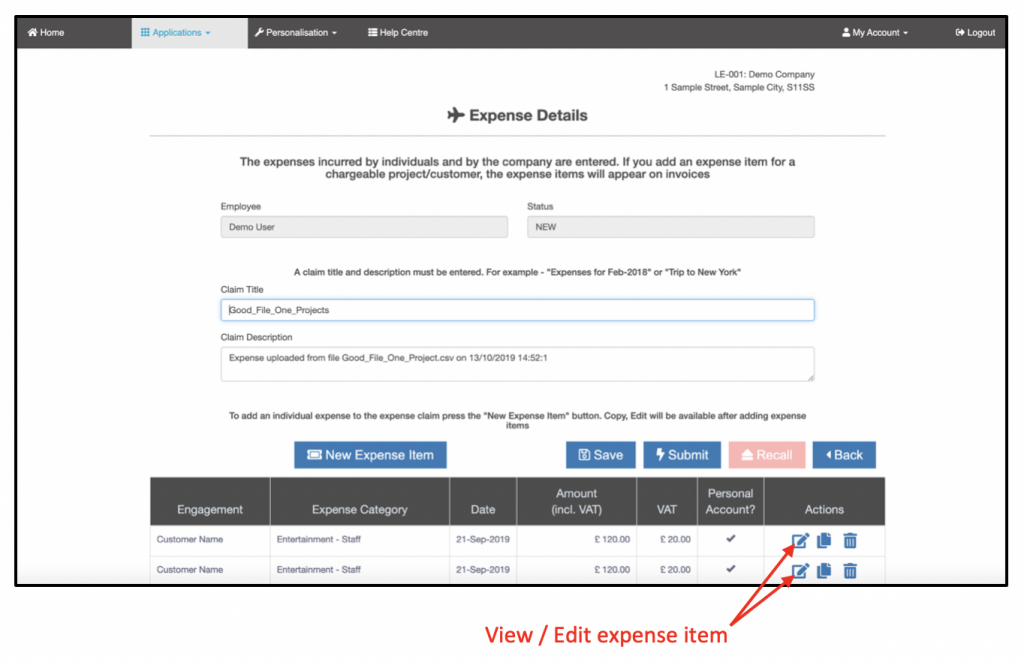
An expense item can be viewed or edited by pressing the “Edit / View” icon besides an expense item.
Copying an Expense Item
An existing expense item can be copied, saving time and effort on creating a new expense item. This is useful when multiple expense items in the same category need to be created within one expense claim.
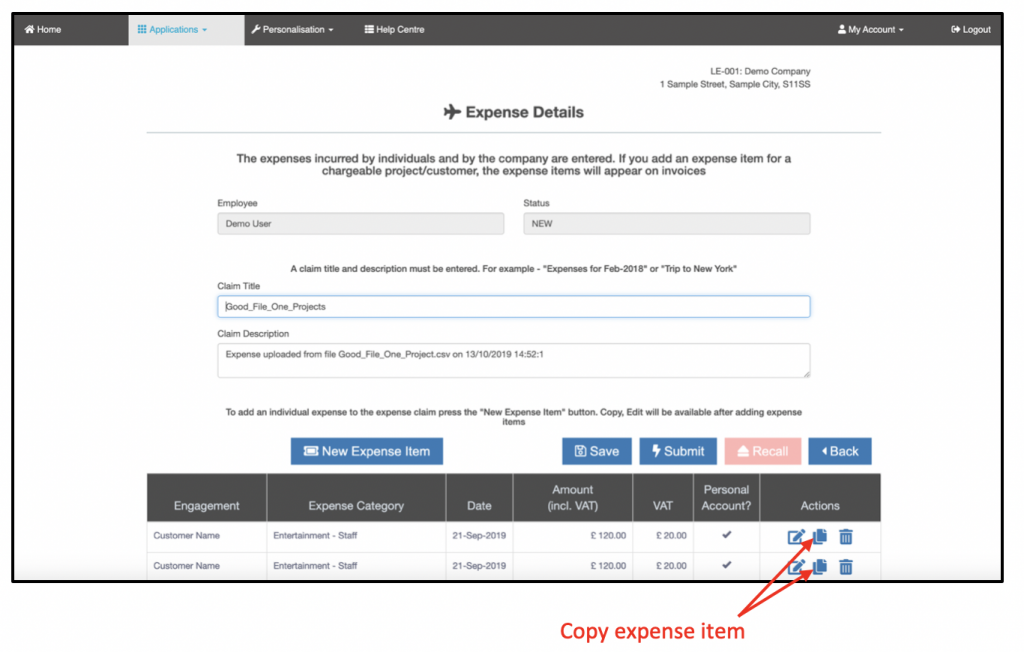
On pressing the copy expense icon, the new copy becomes available for edit.
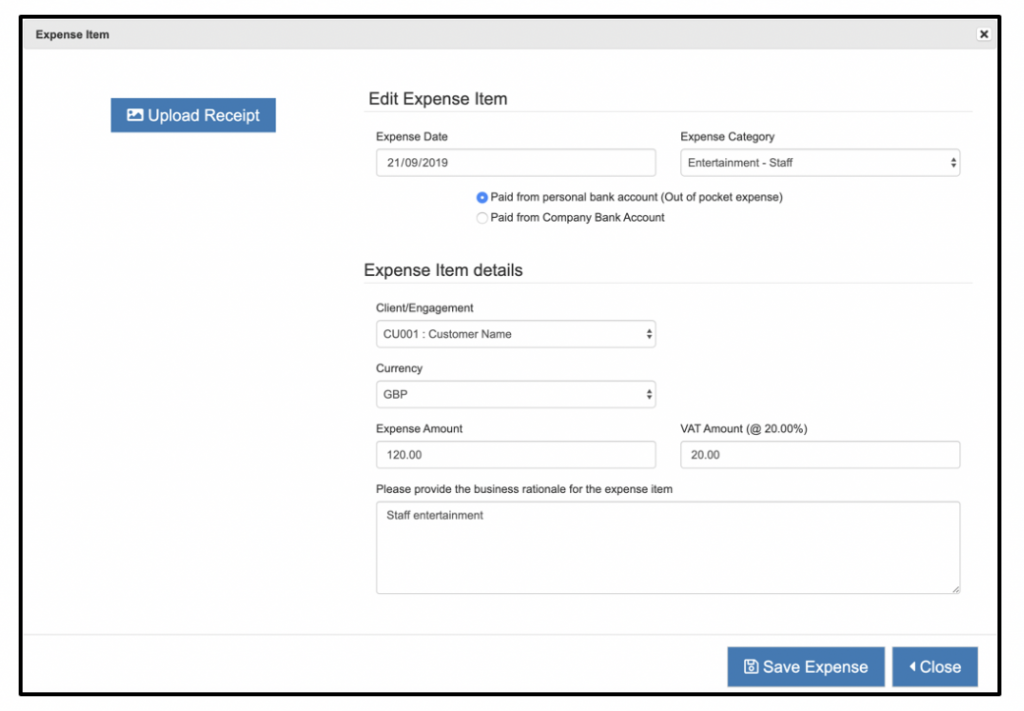
Pressing the “Save Expense” button creates the new expense item, pressing the “Close” button cancels the creation of a new expense item. The expense item can be edited prior to saving.
Deleting an Expense Item from the Expense Claim
An expense item can be deleted by pressing the “Delete” icon besides the expense item.
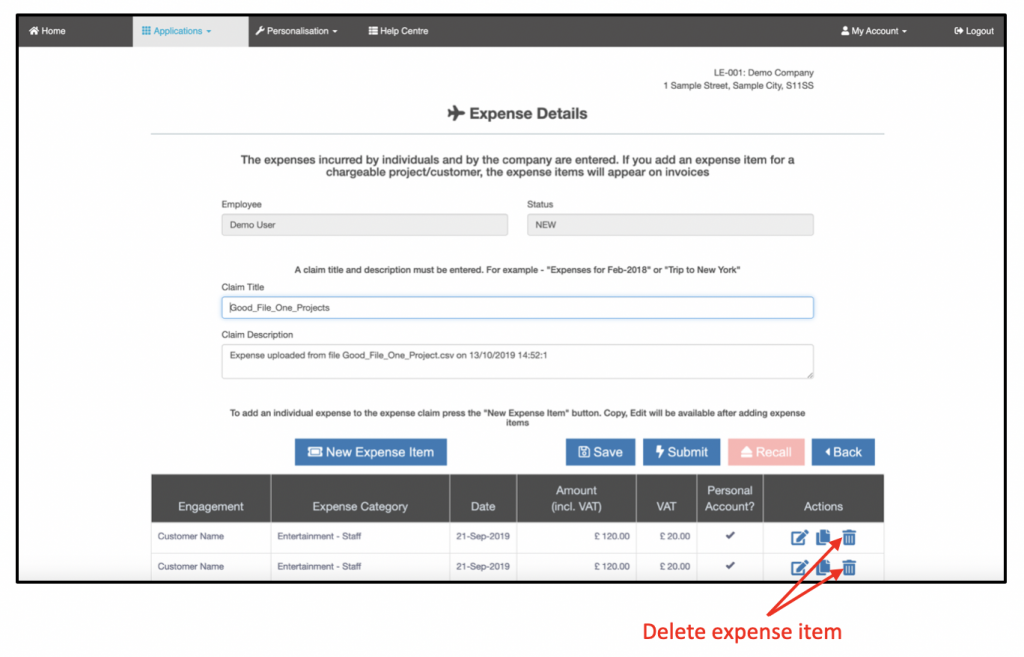
On pressing the “Delete” icon a confirmation window appears, pressing the “Confirm” button deletes the expense item, pressing the “Cancel” button takes the user back to the expense item listing in the expense claim without deleting the expense item selected.

Expense Claim Management
Submitting an Expense Claim
Once all the required expense items have been entered into an expense claim, the expense claim is required to be submitted. The submission of an expense claim performs three actions:
- Makes expenses assigned to a client project available to invoice (once the client invoice is raised the relevant accounting entries are raised)
- Creates the accounting entries for non-client (internal) expenses
- Creates the accounting entries for expenses to be reimbursed to the claimant
To submit an expense claim, press the “Submit” button.
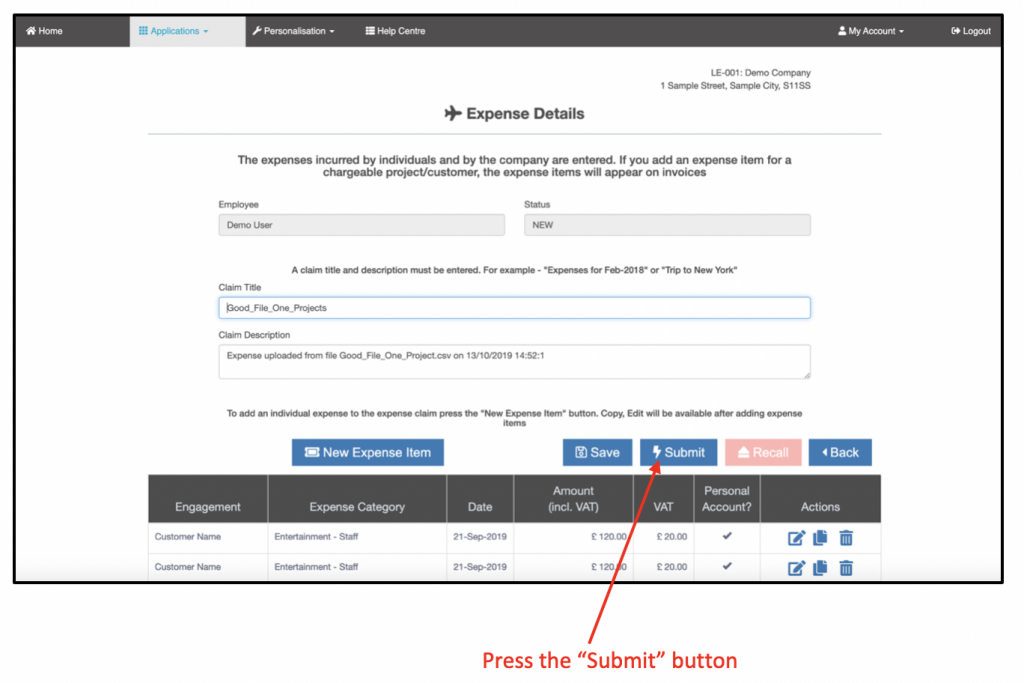
Once the “Submit” button is pressed the accounting entries are created and the expense claim is submitted, if there are large number of expense items in the expense claim this may take a little time, please wait until the process is complete. Once the process is complete the expense claim is submitted.
Recalling an Expense Claim
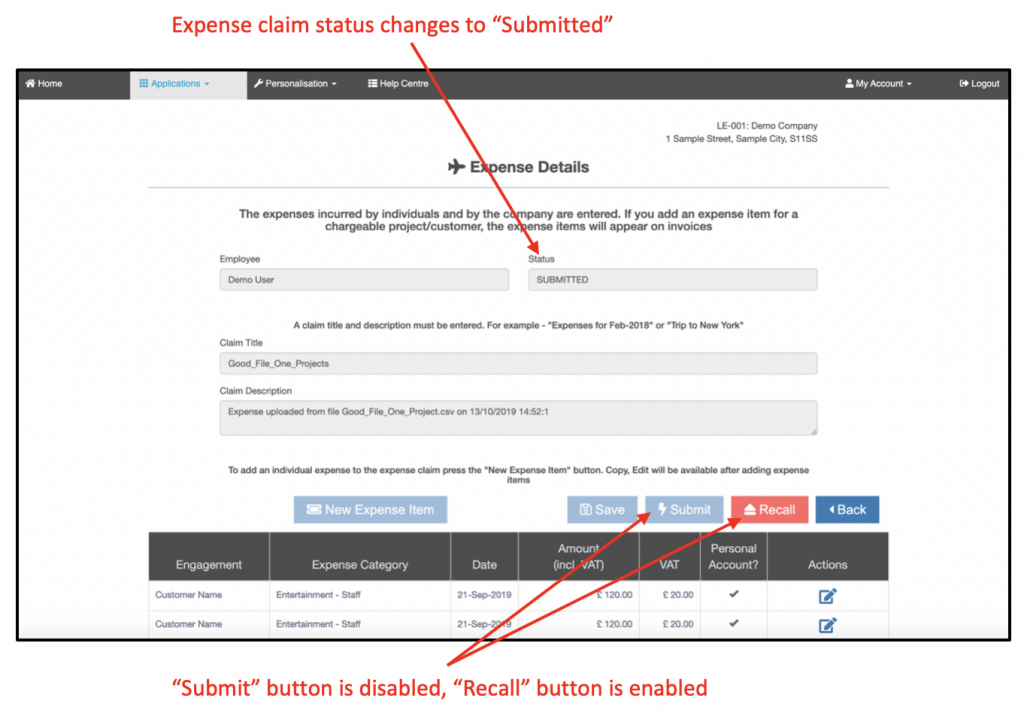
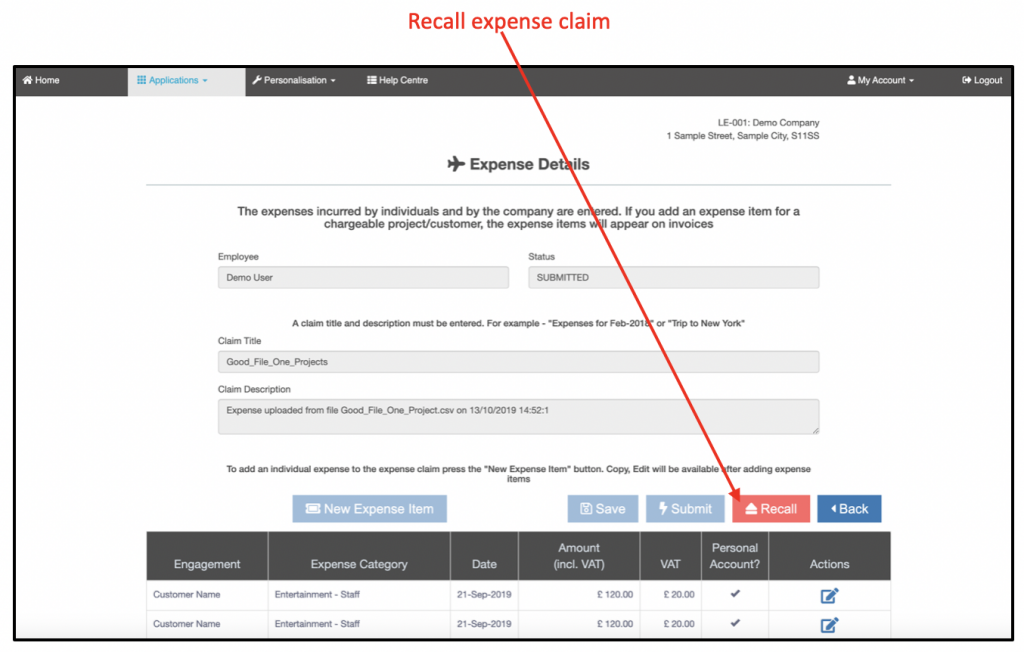
Expense items contained in an expense claim which has been submitted cannot be changed, if there is a requirement to change an expense item in a submitted claim the expense claim must first be recalled. Recalling an expense claim does the following:
- Reverses the accounting postings made under section “7.1 Submitting an Expense Claim”
- Permits the editing of all expense items contained within the expense claim
An expense claim which has one or more expense items included in an invoice cannot be recalled. The invoice(s) the expense items are contained in must be cancelled in order for the expense claim to be recalled.
To recall the expense claim, press the “Recall” button.
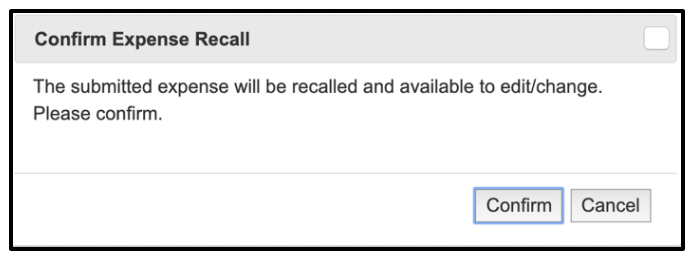
A prompt confirming the intention to recall the expense claim is displayed. Pressing the “Confirm” button recalls the expense claim, pressing the “Cancel” button takes the user back to the expense claim listing without recalling the expense claim selected.
Recording the Payment of Out of Pocket Expenses
Expenses which have out of pocket expense items, that is expense items which are to be reimbursed to the expense claimant are required to have the expense claim marked as “Out of Pocket Expenses Paid”. Marking the expense claim as out of pocket expense claims performs the required accounting postings in the ledger.
The physical payment is required to be made through the banking platform used by the company.
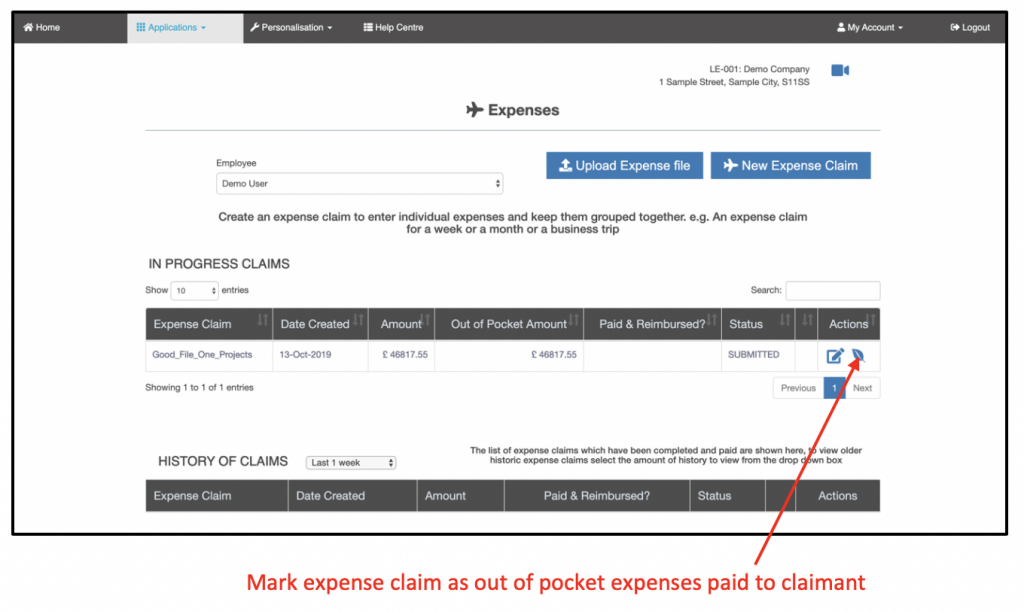
The out of pocket payment for the expense claim is made for the entire amount outstanding on the expense claim.
On pressing the “Mark out of pocket expenses as paid” icon is pressed, a confirmation dialog box appears which requires the date of payment to be selected.
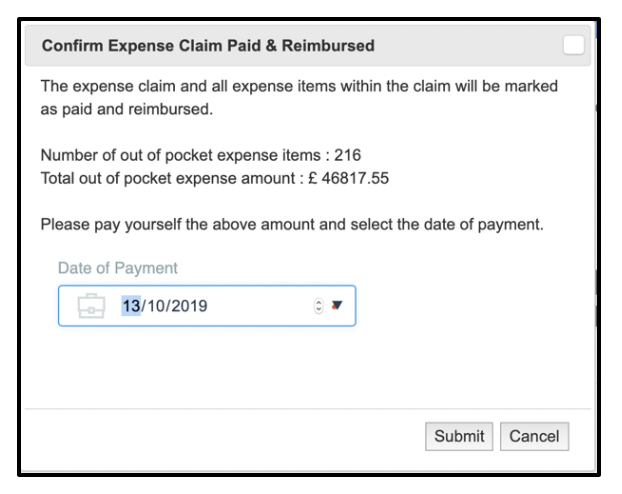
Once the correct date of the physical payment is selected, press the “Submit” button. The accounting entries are then made in the ledger.
Reversing the Payment of Out of Pocket Expenses
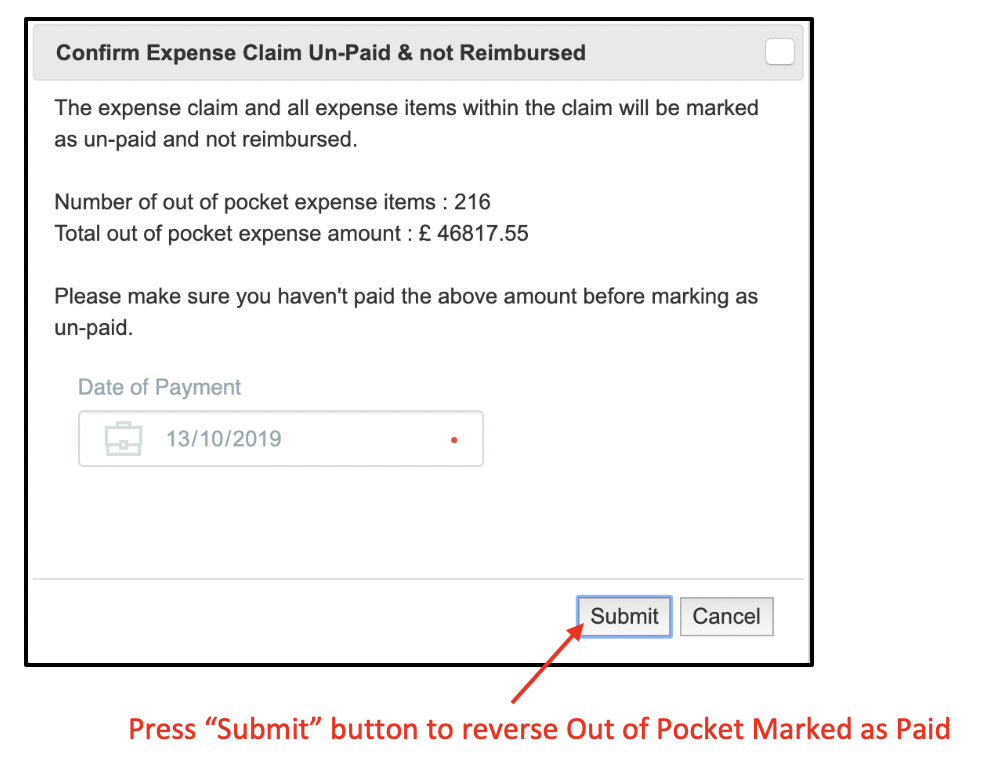
Once an expense claim is marked as paid for out of pocket expenses, the payment marking can be reversed. This is useful in the situation of failed payments or where an expense claim was marked as paid to the claimant in error.
Once an expense claim has been marked as paid, the Mark as Paid icon is reversed.
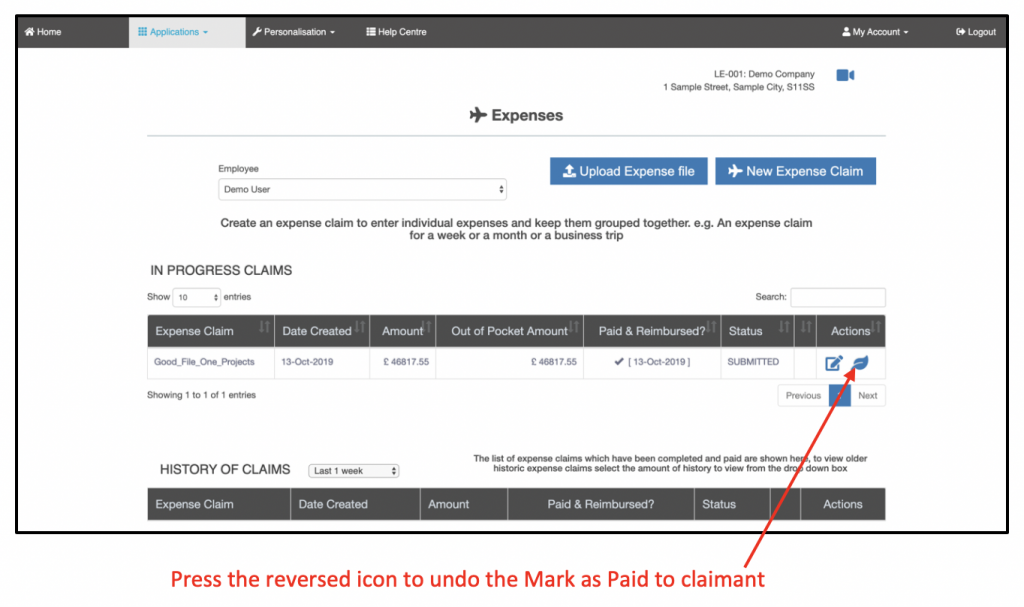
A confirmation dialog box appears to confirm the intention to reverse the mark as paid, pressing the “Submit” button on the dialog box undertakes the action.
Deleting an Expense Claim
An expense claim which has not been submitted or has been recalled can be deleted. This deletes all the expense items in the claim, and deletes the expense claim itself.
Expense claims which can be deleted have a trashcan icon displayed in the actions columns, those expenses claims which cannot be deleted do not have a trashcan icon.
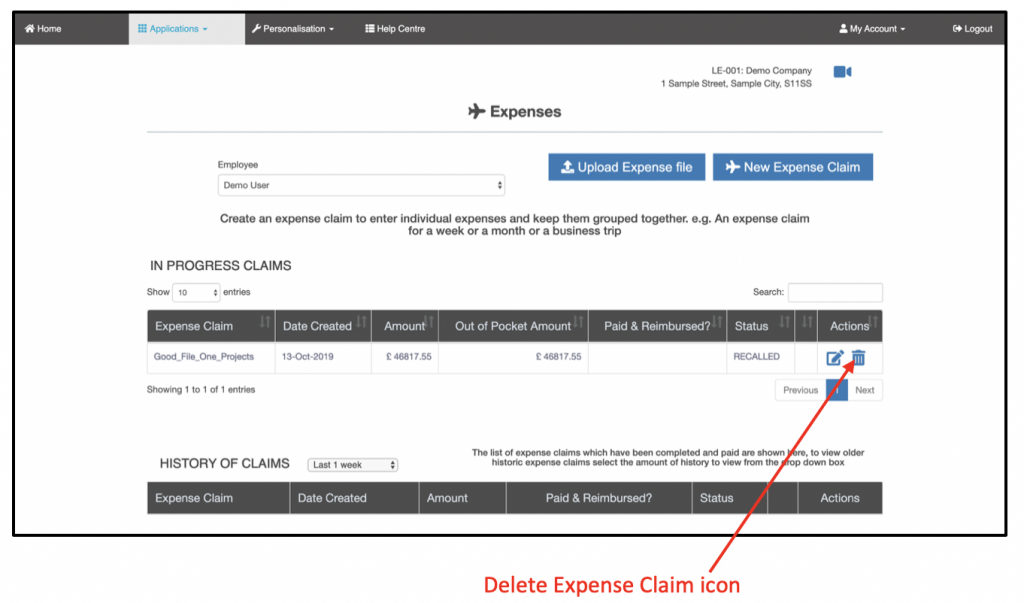
When the trashcan icon is pressed for an expense claim, the following confirmation dialog box appears.
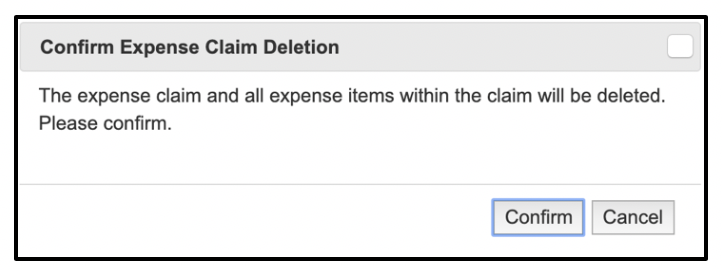
Pressing the “Confirm” button deletes the expense claim (and all expense items in the expense claim), pressing the “Cancel” button does not delete the expense claim.

